Tuesday, December 15, 2009

Scandinavian Baking, Part III - Swedish Tea Ring

This one's for serving company, unless you have a really big family!  I made this with the intention of bringing some to work to share.

2009_1214SwedishTeaRing0012

My mother and her mother made julekage, which is similar to this, except it was full of raisins and currants.  I like raisin bread, and it would be easy enough to mix a pound into this recipe, but hubby won't eat them so I omit.

This isn't my family recipe, although it tastes the same (sans fruit).  It is from our church cookbook, submitted by Margaret Wicktor.
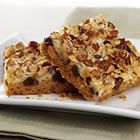
Swedish Tea Ring

2 eggs, well beaten
1 cup milk
1/2 cup sugar
1/4 cup butter (I use only the real stuff)
1 tsp. salt
2 pkgs. yeast (or 4-1/5 teaspoons)
5 cups flour
1/4 cup lukewarm water

For the inside:
1/4 cup melted butter
1 to 1-1/2 cups brown sugar (or more, this recipe didn't specify, so that is about the amount I used)
cinnamon for sprinkling


Mix yeast in 1/4 c. lukewarm water.  Scald milk (heat just until it starts to boil, then remove from heat - it will be about 180 - 185 degrees F, or 82 deg. C) and pour into a large bowl.  Add sugar, butter and salt.  Add half the flour, yeast and eggs.  Beat well. 

2009_1214ChristmasBaking0051

2009_1214ChristmasBaking0053

Add remaining flour, and make a soft dough. 

2009_1214ChristmasBaking0058

Knead on floured board (or your countertop) until light (I took this to mean "not as sticky" - I kneaded the bread about 10-15 times).  Place the dough in an ungreased bowl (no need to cover) and let it rise until doubled in size (about 30-45 minutes). 

2009_1214ChristmasBaking0065

Punch down and divide into 2 parts. 

2009_1214ChristmasBaking0066

Roll out to 1/2-inch thick (mine measured about 7"x10"). 

2009_1214ChristmasBaking0067

Spread with melted butter, cinnamon and brown sugar, then roll up as if you were making cinnamon rolls.

2009_1214ChristmasBaking0068

2009_1214ChristmasBaking0071

Place on an ungreased baking sheet (or two), and cut top with scissors (see picture). 

2009_1214ChristmasBaking0073

Put in a warm place to rise until doubled (there is no need to cover the bread.  For a warm place to rise, I always put a pan of hot water on the bottom rack of my oven and set the temp to 200 degrees for a few minutes, then open the door so it's not too hot).  


2009_1214SwedishTeaRing0001

Bake at 375 degrees for 30 minutes (I baked mine for 20 minutes, then shut off the heat for the last 10, so it wouldn't get too dark). 

2009_1214SwedishTeaRing0003

2009_1214SwedishTeaRing0004

While still warm, frost with icing .

I didn't have an actual recipe, per se - but this is how Mom used to do it:  dump some powdered sugar (about 3/4 c. - 1 c.) into a bowl, mix in about 2 Tablespoons softened butter and 2 Tablespoons milk.  Mix well.
Sprinkle with chopped nuts.  Makes two 12" rolls, which should serve 24-30 people, depending on how thick you slice it.

2009_1214SwedishTeaRing0008

My hubby's a bit on the picky side, so I didn't ice the whole thing.  It would have looked much better with the sliced almonds or chopped walnuts on top, but it was late so I forgot to do that part!

It still tasted good, though.  Especially on a chilly 7 degrees below zero morning, with a cup of hot coffee.

Enjoy!

Monday, December 14, 2009

Scandinavian Baking, Part II: Peppernuts and Fløtegrøt

The part of the world we call Scandinavia consists of five countries:  Norway, Sweden, Denmark, Finland and Iceland.  I've found that a lot of recipes originating in different parts of Scandinavia are similar to each other.  All in all, just about any Scandinavian Christmas cookies can be served together - they are all good!

Last weekend, I spent some time with my MIL, getting our Christmas baking done.  My Mom and Dad-in-law have six kids and are now great-grandparents several times over.  Holiday gatherings have grown to huge proportions.  So there is NO such thing as too many cookies, right?

So MIL is Danish and German.  I'm half Norwegian and then Swedish, with a few other things mixed in.  We baked some things that have been in her family for generations, and some from mine, too.  I think my lefse griddle is about shot, which means I may not make it this year, otherwise I will have to muddle through with my smaller electric frypan or the other griddle that I use for pancakes - which is also smaller.  Someday I will buy a really nice new electric lefse griddle like this one from Bethany House:

But for now I will have to make do.  I digress - sorry.  We made about 30 dozen cookies and a double batch of homemade caramels, which is about 5 lbs., I think.  Maybe a little more. 

While I mixed the Chocolate Crinkles and Andes Mint Chip Cookies, MIL cut up and baked the peppernuts she'd mixed the day before.  I will start with the peppernut recipe.  I believe this is Danish in origin.  This recipe comes from Grandma Nelson, who was my husband's great-grandmother.  We guessed that recipe is well over 100 years old, since Grandma Cohrs, who would be Grandma Nelson's daughter, is now 102 years old.  She's not baking anymore, but I know she'd love to if she could still manage it.

Peppernuts

1 cup sugar
1 cup molasses
1 cup shortening
1 cup boiling water - with 1 tsp soda mixed in
1 tsp. ginger
1 Tbsp. vinegar
1 tsp. vanilla
5-1/2 cups flour
1 tsp. pepper

Mix everything together.  Roll out into long ropes, about 1/2" to 1" in diameter.  (These can now be refrigerated if you want before cutting and baking).

Cut into pieces about the size of a hickory nut or a hazel nut.  Bake at 350 degrees. 


I think those bake for about 10 minutes, we never set a timer when we were baking.  When these are baked, they should retain their shape, and not flatten out like a cookie.  I've seen and tried a few other recipes I've found online and in other cookbooks, but those seem to flatten and aren't very spicy.  An option I've seen is to add cardamom and lots more pepper.  Another option is to use ground white pepper; we used black in ours.

Another recipe we didn't make this weekend but we talked about is Fløtegrøt.  This is as Norwegian as it gets.  It's a pudding that's made with milk (or cream) and flour, and served warm with sugar, cinnamon and butter.  My Grandma Hilda used to add a splash of heavy cream to the top to cool it down for us girls.  After she died, my uncle found that she'd kept boxes and boxes of journals - and this recipe was written down for us there.

Grøt  (* Note - you roll the "r" when you say this.  It sounds like "grute".  Also, the milk Grandma used was directly from the cow - not skim, 1%, or even 2%). 

1 gallon of milk - bring to a slow boil, keep stirring so it won't burn in the bottom of the pan
Add a little flour to thicken like pudding
Add a little salt.
BOIL REAL GOOD!

Add cinnamon, sugar, and sweet cream to taste.

I wonder why she had the "boil real good" part in caps and underlined.  Perhaps a bad batch at some point?  I haven't had this one since I was little, and I don't know if the boys would like it.  I used to love it.  I think I will make it on Christmas morning.  If no one likes it, I could always mix in a little oatmeal, I think.

Scandinavian Holiday Baking, Part I: A Primer

As I promised, I have dug into my stash of Scandinavian recipes, especially for the Christmas holiday.  These have been gathered over the past 20-odd years or so, from various sources.  Some have come from family, some from the huge collection of inherited printed cookbooks, and some from the internet.  I am lucky enough to attend a church that is comprised mainly of Norwegian-Americans, and a bunch of my recipes have come from our own church cookbook and also during our fellowship hour via some quickly scrawled notes written in ballpoint pen on the Thrivent Financial For Lutherans-embossed napkins provided by the insurance company.

Some of these recipes are for basic foods that were eaten on a non-holiday basis in the past but are now reserved for the holidays because of either the fat content or the lengthy process that goes into making them.
Others are traditional holiday treats that have traveled the world with immigrants and kept in families for generations. 

Then, there's lutefisk.  How shall I explain lutefisk to a non-Scandinavian?  Well, let's just say you don't really want to know.  But, since you insist, it's really just dried fish, reconstituted.  In lye.

"What?  In lye?!?" you cry.

Well, yes.  But after it's been soaking in the lye, it goes into a water bath for about 5 days.  All the lye is gone by then, really.  Trust me.

IMG_4879.jpg

"But the smell!"  you exclaim, as the noxious aroma  fills the room when the bag of white fish from Morey's Fish Market is cut open.  By now the tears are rolling down your cheeks, partially from the fear of eating something that was soaked in lye, partially from the fumes.

Mmmm.  That's the smell of my Auntie Yvonne's kitchen at Christmas time.  Brings me back to my childhood, with the smell of roasting turkey mingled with lutefisk in cream sauce.  Yvonne's a Swede.  So is my mother.  They both married Norwegians, my dad and my uncle Trueman are 100% Norsk.  Norwegians usually eat their lutefisk drenched in melted butter.  That's how I prefer it, but Aunt Yvonne still makes the best lutefisk, even if it is in cream. 

For more info on lutefisk, look to Wikipedia.  I can't say the article is perfect, but there's some good info there.

Before I really dive into the recipes, there are a few things that you may want to know.  If you are in the U.S. or would just generally be interested in a good metric conversion chart for cooking, I found one here:  Metric Conversion Chart.

Another thing that is good to know is what your options are for hard-to-find Scandinavian ingredients.  While it seems that finding eggroll wrappers or agave nectar is as simple as taking a trip to your local Cub foods or Walmart, finding things like pearl sugar or hornsalt can be difficult if you don't know where to shop.

Luckily for me, Minnesota has a large enough population of people with Scandinavian blood that it's a bit simpler here.  Ingebretsen's , located at 1601 E. Lake Street in Minneapolis, Minnesota has been selling Scandinavian foods and gifts for over 85 years.  You can even take classes there, from knitting and making Hardanger lace to cooking and wood carving.  Or just go to a story telling event to hear some stories from Norse mythology.  If you are unable to get to Minneapolis, they have other locations as well, and online shopping is also available.

Ingebretsen's Mural - corner of 16th and E Lake Street

Even if you aren't as lucky as I, to be living smack dab in the middle of little Norway (a.k.a. Minnesota), at least most of the ingredients are pretty basic:  eggs, flour, milk, cream and sugar.  Which of course means that most of these cookies and other treats turn out white - or just a shade darker than that.  My German-Danish husband kids me all the time that all of my cooking turns out either white... or black.  Brown is cooking, black is done, as my dad always used to say. 

Well, I am going to break this into a few shorter sections, as not to bore you too badly.  So consider this an introduction, more pics and recipes will follow - stay tuned :)

Thursday, December 10, 2009

Time For a Re-post!

I posted this recipe back in April, but since Christmas is approaching with break-neck speed I figured it was time to post it again! 
I even posted a picture this time, looks like I left it out last April.


LAST COOKIE.
I was lucky to get this photo.  This batch went awfully fast!
Toffee Almond Sandies...mmm...


I often find myself swapping recipes with relatives or friends at work, church or elsewhere. We are all working moms, and who would know better than a working mom how important it is to share good things that work?

My hubby's aunt, Punky, gave this recipe to my mother-in-law, Dawn, who is the source of some of the best and easiest recipes I have. Absolutely maaavelous! These melt in your mouth...

Auntie Punk’s Toffee Almond Sandies

My new favorite cookie!

1 cup butter (Auntie Punk uses ½ margarine)
1 cup sugar
1 cup powdered sugar
1 cup oil
2 eggs
1 tsp almond extract
4 ½ cups flour
1 tsp baking soda
1 tsp cream of tartar
1 tsp salt
2 cups chopped almonds (sliced almonds work well, too - Punky uses walnuts)
1 package English toffee bits (I use the Heath candybar brand bits without the chocolate).

Mix together butter, powdered & granulated sugars, oil, eggs and almond extract with an electric mixer.

Add all of the remaining ingredients and mix by hand. Roll dough into 1 ½” balls, then roll in granulated sugar. Place on ungreased cookie sheets and flatten a little with a glass, fork or fingers (if you use a glass, dip the bottom of the glass in sugar to keep the cookie dough from sticking). 

**NOTE  -  This cookie dough may seem a little sticky.  It's ok to chill the dough in the refrigerator before rolling into balls.  I make mine one day, then bake it the next to break up the work if I'm really busy.**

These cookies will spread a little, flattened cookies should be spaced about 1 ½” – 2” apart.

Bake at 350° F. for 12-14 minutes (only until set firm, not brown).  Allow cookies to cool on the pan for a couple of minutes before moving to a towel or cooling rack.

Yield 8-10 dozen.

I am going to try something different next time: substituting rum extract for the almond extract, and pecans in place of the almonds. I will let you know how it turns out!
 
 
12/10/09 - P.S. - I did try out the recipe with the pecan and rum extract substitutions.  They tasted alright, but the original is far better!  Something about the almond flavor and scent of the cookie and the almond chips with the toffee just seemed to mix better to me. 

Friday, November 6, 2009

Seven Layer Bars

I have had Seven-Layer Bars before. I will say that the ones I had at work today were the best, though!

My friend Terri, made a pan of these for another one of our friend's birthday. Or should I say pre-birthday? It's really tomorrow, but that's alright. Bars are good anytime!

2 packs of graham crackers, crushed
2 sticks of butter
1 cup semi-sweet chocolate chips
1 cup butterscotch chips
1 cup chopped walnuts
1-1/3 cup flaked coconut
1 can sweetened condensed milk

Melt two sticks of butter, Add in crushed graham crackers. Mix well. Press graham cracker mix onto the bottom of a 9x13 pan ( don't grease the pan, but I use a glass one) .

Then sprinkle both flavors of chips and walnuts. Pour sweetened condensed milk over chips and walnuts- spread to cover evenly. Sprinkle coconut on top. Bake at 325 for 25-30 minutes.

Monday, November 2, 2009

Apple Butter

OK, I know - I said Scandinavian recipes would be the focus of my next few posts. As far as I know, apple butter is German in origin. But that's close enough, right?


Germany is right below Denmark, anyway - which is part of Scandinavia. Hubby is German and Danish on his mother's side, and she makes the apple butter in the family. She usually sends some over, but the kids gobble it up so fast that Hubby & I have sometimes missed out if we don't make toast right away. That's what happened again this year.

About a week ago my sister in law asked me if we could use some apples. We happened to be at her house when someone dropped some off for her. Of course, we could use some apples!

I didn't count on "some apples" being a bushel full! I had already pulled out about 3 pounds for apple crisp, and about the same amount for the first batch of apple butter when I took this photo:
2009_1029WafflesAndAppleButtr0007
The shiny thing in the background is our big metal cooler, if you want to put this into perspective.
2009_1029WafflesAndAppleButtr0009
They may not look very pretty, but they are perfect for baking or eating. Sweet, tart, and perfectly crisp. Minnesota has the perfect climate for apples. I haven't tried the Sweet Tango, which is the newest apple developed at the University of MN, but the Honeycrisp is wonderful - and I've heard the new one is even better. I have no idea what kind of variety these are, but that's ok, they are still good!

Here's the recipe that I found for apple butter in one of my many recipe books and clippings. It comes from a Land O'Lakes cookbook I got from my mother years ago, and it doesn't take 24 hours to make!

Apple Butter

3 lbs. (9 medium) tart cooking apples, peeled, cored, quartered
1/2 cup apple juice or cider
1 1/2 cups sugar
1/2 cup firmly packed brown sugar
1 1/2 teaspoons ground cinnamon
1/4 teaspoon ground allspice
1/8 teaspoon ground nutmeg
2 tablespoons cider vinegar

2009_1029WafflesAndAppleButtr0010

Cook apples in apple juice or cider in a large saucepan (covered), until apples are soft (25 to 30 minutes). I use my Dutch oven for this - since it's big enough to hold all the apples and they won't jump out of the pot when I'm stirring. Put apple mixture in food processor bowl fitted with metal blade (or 5-cup blender - that's what I use). Cover; process until smooth (1 to 2 minutes).

2009_1029WafflesAndAppleButtr0011

Return apple mixture to same pan; stir in all remaining ingredients.

2009_1029WafflesAndAppleButtr0013 2009_1029WafflesAndAppleButtr0014

Cook over low heat, stirring often, until mixture is very thick (30 to 45 minutes). I cooked mine longer, as it didn't seem thick enough. I think it was more like an hour or an hour and fifteen minutes. Serve warm or cold on pancakes, waffles, toast or warm breads. Store refrigerated.

2009_1029WafflesAndAppleButtr0016
You can freeze this for as long as you want, or you could also put it into jars and can it as well. If you do that, I'd process the jars under an inch of boiling water for 10 to 15 minutes.

What, you haven't done any canning before? It's easier than you'd think. We'll have to talk about that later. Questions about canning before then? Ask away, I'll answer what I can.

Wednesday, October 28, 2009

Norwegian Baking


07-dec-26
Originally uploaded by sashafatcat
It seems as though I always start digging out my Scandinavian recipes as soon as the temperature drops near the 40 degree mark. That would be about 4 1/2 degrees Celsius, if you're in Norway or any part of the world other than the U.S., Burma or Liberia.

I guess when I realized that most of the world is using the metric system, it dawned on me that it wouldn't be such a bad idea to post the metric equivalents for ingredient measures when I post recipes! Well, I may or may not - all depending on how motivated I am.

Lately that hasn't been much, as I'm sure you've noticed by the frequency of my posts. Sorry, I hope you haven't been waiting for any ideas for dinner! If you read any of my other blogs (just check my profile for links if you are interested), you'll know just how crazy my life has been lately. Or shall I say how crazy I am? Crazy enough to go back to school besides working a full-time job and raising three teenage boys.

Oh, yeah - I also hit a deer last Wednesday with my van. More venison recipes will follow! But venison aside, I digress - where was I? Oh yeah, the Scandinavian recipes! I found a steal of a deal on eBay, and couldn't pass it up. I bought an old Krumkake iron for under $10. They're usually more like $40. Of course this isn't the fancy electric kind that makes two at a time, but it will keep me busy while the boys are frying rosettes. The picture here was another one I found on Flickr - so good of the kind people there to share their photos and allow others to use them! It sure helps me out when I'm too busy to get photos taken of my own. Check back for step-by-step photos of my Norwegian recipes - My next few posts will be dedicated to those, just in time for holiday baking.

Tuesday, September 15, 2009

Pretty Enough to Eat?

Photo of Green Bean and Nasturtium Salad With Tarragon Dressing

I found the above photo on foodistablog's photostream on flickr. Pretty, isn't it? I learned something interesting recently, and wanted to share it with you. A lot of people realize that some flowers are edible. Nasturtiums, like the ones shown above in that beautiful salad, dandelions, chamomile and lavender flowers are commonly used as food. There's a great article on What's Cooking America, which goes into detail which flowers are edible and how you can prepare and use them.

The interesting fact that I learned, which I mentioned above, is that morning glories are definitely NOT on the edible list!

Not that I had planned on eating my morning glories, I think they are too pretty to cut. This beautiful bloom is from my own garden, caught after a morning rain.

Eating morning glories can cause LSD-like hallucinations, which in itself doesn't sound all that horrible if that's your cup of tea, but the "...which leads to rapid heart rate, failure, and death" part didn't appeal to me!

The part that bugs me the most is that I can't find the site that listed all of those poisonous plants and the symptoms that accompany contact with them. Let's just say that I was attempting to look up what it was that I tried pulling out of my garden without gloves. The little spines that stuck my hand left my right hand feeling like it had been injected with novacaine for about 24 hours. A little alarming, but it didn't warrant a half-hour drive to the ER at 9pm that night. I took some Benedryl before bed, though!

Word to the wise: know which plants in your area are poisonous, and always wear gardening gloves!

Wednesday, September 9, 2009

Mmm... Pot Roast with Potatoes

A good, tender, pot roast is really not so difficult. In fact, I like to make this when it gets cool outside, especially since it's not labor intensive at all.

First, heat (on high heat) about 1/4 to 1/3 cup oil in a big pot with a lid. I use Extra Virgin Olive Oil, since it's better for you and it will make your roast delicious. When the oil is very hot, carefully place the chuck roast into the pan, take care not to splatter the hot oil on yourself. I use either two large forks, or a large fork and a knife. You don't want to just flip this into the pan, you may get burned.

Season well with salt, garlic salt or powder, and black pepper. Sear the roast on high heat for a few minutes on each side, until dark brown. It may look close to burned, but it's not.

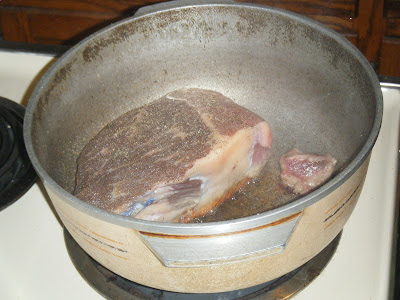
After the beef has been seared on both sides, add 1 cup of water. Cover and transfer from the stove top to a 350 degree oven for one to one and a half hours (depending on the size of the roast - I did an hour and a half for a 3-lb. chuck roast). After the first hour, add quartered potatoes, some carrots, and onion if you like. Stir those into the meat juices and return to the oven for 30-40 minutes I was really rushed with other things tonight, so I only added the potatoes and did the mixed veggies in the microwave.

When the timer goes off, check a potato to see if it's tender. If it is, you are done!
If you like gravy, transfer all of the meat and veggies from the pot to a large bowl or roaster pan and cover, leaving the meat juices in the original pan. Add about 1 1/2 cups water to the pan, blending the meat juices with the water. If the mixture does not taste strong enough, add a cube or two of beef boullion. The broth should be strong. In a separate bowl (or even better yet - a cup with a tight-fitting lid, combine 3 tablespoons flour and 1 cup of water, mixing or shaking until all the lumps are gone. Stir thoroughly into the broth. Heat to boiling, stiring constantly as to avoid lumps. Boil for at least one full minute. Gravy will thicken a little more as it cools. If you like mushrooms, add a can of cream of mushroom soup to the gravy - that will stretch it a little further. I never seem to make enough gravy for potatoes, my guys all like it a lot - so the cream soup is a handy trick I picked up from my mother-in-law.

Tuesday, September 1, 2009

S'More Bars


I will admit, when the mixture for these bars was all blended together, I thought, "wow. This looks awful." The hot marshmallow goo melted the Hershey's chocolate and the whole mixture looked like a sticky brown mess. But when I tasted one, I no longer cared what it looked like. It was heaven! Not only that, it helped me use up the enormous quantity of marshmallows I purchased for my middle son's birthday party. Hardly anyone made s'mores, so what would our family do with all the leftovers? My husband hates anything marshmallow-related, even Rocky Road. Blasphemy! How can anyone hate Rocky Road???


S'More Bars

5-6 cups Kellogg's Crispix Cereal (1/2 a box)
1 pack graham crackers, crunched into 1" to 1/2" pieces
6 1.5-oz bars of Hershey's chocolate (an entire 6-bar multi pack), broken
into 1/2" to 1" pieces (reserve 1 broken up candy bar for the top of the bars)
2 bags of marshmallows, at least one of those bags should be mini's
1 stick of butter

Mix the cereal, graham cracker pieces, half a bag of mini-marshmallows
(reserve 1 cup of the minis for the top) and 5 of the broken candy bars (except
for one for the top) in a really big bowl.


Grease a large 9x13 pan with some of the butter.


Melt the rest of the butter on low to medium heat, just until melted. Add a
full bag of marshmallows and what's left of the other after putting half of it
into the cereal mix & holding out a cup for the topping. Mix the
marshmallows and butter together while they melt, blending until smooth.

First, coat your hands with a bit of butter or shortening - this will get
sticky. This next part should be done quickly, the marshmallow goo cools
quickly:

Once the marshmallow is melted and gooey, pour over the cereal mix, mixing
together until everything is covered in marshmallow.

Dump the mix into the pan, pressing it down evenly. While still warm, top
with the remaining pieces of chocolate and marshmallow and then allow for at
least 30-40 minutes before serving. I would recommend refridgerating this one if
your kitchen is warm, so the chocolate doesn't get too melted on top.


Monday, August 24, 2009

The Birthday Salad

I didn't manage to get a photo of this salad before I served it - the guests at my son's birthday party were hungry! It's got a lot of the same ingredients you might find on your favorite pizza. I assembled the following ingredients on Friday night, and let it marinate over night in the fridge:

16-oz box of rotini pasta, cooked, drained & rinsed
1, 3.8 oz. can of pitted, sliced black olives, drained
1 pint of cherry tomatoes
8 oz. sliced mushrooms, rinsed
4 oz. sliced pepperoni
1 large green bell pepper, cut into 1" pieces
4 oz. shredded mozzarella cheese
1 bottle of Italian salad dressing
garlic salt & black pepper to taste
Before serving, I should have sprinkled parmesan cheese over the top, but I never took it out of the cupboard. I think everyone liked it anyway.

This recipe easily fed about 20 people (as a side dish), and we still had leftovers afterward. I used two packets of the Good Seasonings Italian Salad Dressing mix and mixed those according to the directions on the package. If you want a stronger seasoning, I would recommend sprinkling a bit of the seasoning mix (unprepared) into the salad before you marinate overnight.

Friday, August 21, 2009

Another Birthday Party!

I love parties – especially the kind where your guests can help prepare their own food :)

We are having a party for my middle-son’s 15th birthday tomorrow – complete with bonfire, s’mores and cake. In hopes of keeping the kitchen cool, I will be purchasing a few packs of hotdogs, which the partygoers will be able to roast on their own. I will also put together a salad and serve the other obvious sides (a.k.a. baked beans and chips). Yes, there will be photos – I have to, because you will want it for the salad recipe. So hang on for another day or two – the recipe is in the works!

Thursday, August 13, 2009

The Diet Wagon

If I drink Slim-Fast for breakfast and then have a
glazed donut with my coffee during my morning break, does it really mean I’ve fallen off the diet wagon? And landed squarely on a big, cushy pile of bakery items?

I’d like to think that all of the fresh veggies from the garden and the Slim-Fast (even though it is the milk-chocolate flavored kind) balance out all of the sweets my co-workers insist on sharing. Sitting in a cube has its disadvantages, like being the one who is located closest to the cabinet where all the goodies are put after meetings! I was doing so good, too: my desk was stocked with organic cereal bars and fruit, a few cans of Slim-Fast just in case I either forgot to pack a healthy lunch or was just too rushed to grab something before leaving the house in the morning.

I need to work on replacing all of the quick stuff (a.k.a. unhealthy, overly-processed fast-food type stuff) in my freezer with some healthier, home-cooked meals for when I am short on time. I used to do this when the kids were younger and my husband and I worked opposite shifts.

Some of the things I prepared extra of and froze were lasagna, tater-tot hotdish and chili. The chili isn’t so bad for you, but I really need to work on finding a few more healthy (and tasty) short cuts to add to my quick-to-cook arsenal.

I’ve been really slacking lately, as far as the home-cooking goes. Frozen pizza and chimichangas are far to enticing in the frozen foods aisle. I know this because I saw a horrible picture of myself taken by my husband a couple of weeks ago. Let’s just say I won’t be sharing that photo on any of my blogs! It was less than flattering.

Here’s my healthy recipe for this week. This is a bare-bones recipe that can be added to however you wish, so have fun!


Crunchy Mandarin Almond Salad With Chicken

1 package ramen noodles, broken apart into small pieces and separated
1 small can Mandarin oranges
½ a head of lettuce, torn or shredded
¼ cup toasted almonds
sesame oil
1 grilled, skinless, boneless chicken breast – cut into strips or bite-sized pieces (or substitute 1 can of cooked chicken)
sliced red onion
Dressing of your choice: a fat free poppy seed or any Asian-inspired dressing you like will do.

Sautee the ramen noodles in hot sesame oil until lightly toasted. Remove noodles from pan and put chicken in the pan to heat through. While chicken is warming, toss toasted ramen noodles with remaining ingredients (except dressing), then top with the chicken immediately before serving.

Here’s a list of additions, if you want to add more:
Dried cranberries
Sunflower seeds
Sesame seeds
Cashews
Sliced green onion
Sliced red or green cabbage
Chopped bell peppers (any color)
Fresh edemame (baby soybeans in the pod)
Fresh sugar-snap peas
The greatest thing I love about salad is that you can mix together just about any combination of vegetables and it still tastes good :)

Sunday, August 9, 2009

The Rhubarb Is Officially Done!


There it is. The last of it. I picked the last few stalks of rhubarb, sliced them neatly into 1" pieces, measured 2 cups into each small baggie, then tossed those baggies into labeled, gallon-size freezer bags. Most recipes that call for rhubarb require multiples of 2-cup measures, so this way I do not have to measure it later. No preparation is required before freezing, so it's really quick and easy. I don't even need to include directions for this one! It does last a very long time in the freezer, though - so I do recommend dating the freezer bag.

I still haven't gone through the stuff from last year. I will be baking rhubarb cake and crisp again as soon as it cools down. Like I'm really disappointed with that! Hah! Well, the scale might not like it, but I guess that means I will have to share :)

Wednesday, August 5, 2009

Marinated Zucchini & Peppers

Simple stuff to throw on the grill. Yum. If you slice the veggies thick enough, put them right on to the grill, otherwise, make a shallow bowl of tin foil & add them about 6 or 7 minutes before the meat is done grilling. Mmm...

sliced vegetables - zucchini, peppers, onions - whatever you like
Italian dressing

Combine & marinate for about 20 minutes or so, then grill.

: ) Short & sweet - no mess, no cleanup!

Thursday, July 23, 2009

Do You Remember the Jam Recipe I Promised?

I couldn't find it! I am horrible! But I think I remember it - because it's a variation of one I have on hand from another source. So while I was in the process of cutting rhubarb for freezing, I remembered the jam and thought that it's time to get that posted. About this time of the year I start getting ready for canning and freezing, so while I find all of my jars and seals and lids and things this blog may be a bit quiet. But keep checking back - because I usually can't keep quiet for long, according to my hubby :)

So for your reading enjoyment you may possibly find some odd things tossed in here. It will pertain to food, but it may end up that one day you will find a restaurant review, the next you may find a recipe for a lemon drop martini - who knows?

Here's an enjoyable way to use up some rhubarb! I got this recipe from my friend Terri K. at work:

Rhubarb Slush

8 cups Rhubarb
2 quarts water
3 cups sugar
1/2 cup lemon juice


Combine all and cook until tender. Strain and put in ice pail.
Add 2 cups vodka and 1 package strawberry jello, then freeze.
Scoop frozen slush into cups and top with Sierra Mist.

Great for parties - this recipe makes a LOT! Enjoy!

Monday, July 20, 2009

Wild Goodness

Good things can sometimes happen when you don't mow the lawn.


Well, that is, if you live in a rural township where you won't get fined for letting the grass get a little long. I knew there were wild grapes, raspberries and gooseberries growing abundantly in the woods surrounding our house, and I noticed this tiny grapevine growing in the ditch on the edge of our yard.

So I told the boys and my husband not to mow the ditch. The boys certainly didn't mind, and my husband could have cared less - well, if there was a good reason for it, anyway. It's not like he wants the yard to look like a wild overgrown mess, but he realizes that I can identify edible things in the woods, so he trusts my judgement when it comes to wild foods.

This tiny, weed-like plant to the right is a raspberry cane, sprouting from the earth near the road.


I've discovered about 10 wild grape vines and an uncountable amount of thorny little raspberry shoots. Not all thorny plants in the woods of Minnesota are raspberries, though.
The American gooseberry is also very prickly. Each adult berry bush can yield 6 to 8 gallons of berries, which are great for jam and wine. This berry on the left isn't ripe, yet. When ripe, the berries are a stunningly beautiful shade of deep, wine red.
As with any wild berries or fruits, you must be certain that you've identified the plant correctly. Some plants are poisonous, and may look similar to other plants that are edible.
Like mushrooms, for instance. NEVER, ever pick wild mushrooms. Unless you have been trained to properly identify which ones are edible, it is far too easy to make a fatal mistake. If you eat a poisonous mushroom, you may be lucky enough to get to an emergency room; however, you might not. I'd rather not take that chance, mushrooms are much better from the grocery store, anyway :)