Thursday, December 10, 2009

Time For a Re-post!

I posted this recipe back in April, but since Christmas is approaching with break-neck speed I figured it was time to post it again! 
I even posted a picture this time, looks like I left it out last April.


LAST COOKIE.
I was lucky to get this photo.  This batch went awfully fast!
Toffee Almond Sandies...mmm...


I often find myself swapping recipes with relatives or friends at work, church or elsewhere. We are all working moms, and who would know better than a working mom how important it is to share good things that work?

My hubby's aunt, Punky, gave this recipe to my mother-in-law, Dawn, who is the source of some of the best and easiest recipes I have. Absolutely maaavelous! These melt in your mouth...

Auntie Punk’s Toffee Almond Sandies

My new favorite cookie!

1 cup butter (Auntie Punk uses ½ margarine)
1 cup sugar
1 cup powdered sugar
1 cup oil
2 eggs
1 tsp almond extract
4 ½ cups flour
1 tsp baking soda
1 tsp cream of tartar
1 tsp salt
2 cups chopped almonds (sliced almonds work well, too - Punky uses walnuts)
1 package English toffee bits (I use the Heath candybar brand bits without the chocolate).

Mix together butter, powdered & granulated sugars, oil, eggs and almond extract with an electric mixer.

Add all of the remaining ingredients and mix by hand. Roll dough into 1 ½” balls, then roll in granulated sugar. Place on ungreased cookie sheets and flatten a little with a glass, fork or fingers (if you use a glass, dip the bottom of the glass in sugar to keep the cookie dough from sticking). 

**NOTE  -  This cookie dough may seem a little sticky.  It's ok to chill the dough in the refrigerator before rolling into balls.  I make mine one day, then bake it the next to break up the work if I'm really busy.**

These cookies will spread a little, flattened cookies should be spaced about 1 ½” – 2” apart.

Bake at 350° F. for 12-14 minutes (only until set firm, not brown).  Allow cookies to cool on the pan for a couple of minutes before moving to a towel or cooling rack.

Yield 8-10 dozen.

I am going to try something different next time: substituting rum extract for the almond extract, and pecans in place of the almonds. I will let you know how it turns out!
 
 
12/10/09 - P.S. - I did try out the recipe with the pecan and rum extract substitutions.  They tasted alright, but the original is far better!  Something about the almond flavor and scent of the cookie and the almond chips with the toffee just seemed to mix better to me. 

Friday, November 6, 2009

Seven Layer Bars

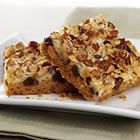
I have had Seven-Layer Bars before. I will say that the ones I had at work today were the best, though!

My friend Terri, made a pan of these for another one of our friend's birthday. Or should I say pre-birthday? It's really tomorrow, but that's alright. Bars are good anytime!

2 packs of graham crackers, crushed
2 sticks of butter
1 cup semi-sweet chocolate chips
1 cup butterscotch chips
1 cup chopped walnuts
1-1/3 cup flaked coconut
1 can sweetened condensed milk

Melt two sticks of butter, Add in crushed graham crackers. Mix well. Press graham cracker mix onto the bottom of a 9x13 pan ( don't grease the pan, but I use a glass one) .

Then sprinkle both flavors of chips and walnuts. Pour sweetened condensed milk over chips and walnuts- spread to cover evenly. Sprinkle coconut on top. Bake at 325 for 25-30 minutes.

Monday, November 2, 2009

Apple Butter

OK, I know - I said Scandinavian recipes would be the focus of my next few posts. As far as I know, apple butter is German in origin. But that's close enough, right?


Germany is right below Denmark, anyway - which is part of Scandinavia. Hubby is German and Danish on his mother's side, and she makes the apple butter in the family. She usually sends some over, but the kids gobble it up so fast that Hubby & I have sometimes missed out if we don't make toast right away. That's what happened again this year.

About a week ago my sister in law asked me if we could use some apples. We happened to be at her house when someone dropped some off for her. Of course, we could use some apples!

I didn't count on "some apples" being a bushel full! I had already pulled out about 3 pounds for apple crisp, and about the same amount for the first batch of apple butter when I took this photo:
2009_1029WafflesAndAppleButtr0007
The shiny thing in the background is our big metal cooler, if you want to put this into perspective.
2009_1029WafflesAndAppleButtr0009
They may not look very pretty, but they are perfect for baking or eating. Sweet, tart, and perfectly crisp. Minnesota has the perfect climate for apples. I haven't tried the Sweet Tango, which is the newest apple developed at the University of MN, but the Honeycrisp is wonderful - and I've heard the new one is even better. I have no idea what kind of variety these are, but that's ok, they are still good!

Here's the recipe that I found for apple butter in one of my many recipe books and clippings. It comes from a Land O'Lakes cookbook I got from my mother years ago, and it doesn't take 24 hours to make!

Apple Butter

3 lbs. (9 medium) tart cooking apples, peeled, cored, quartered
1/2 cup apple juice or cider
1 1/2 cups sugar
1/2 cup firmly packed brown sugar
1 1/2 teaspoons ground cinnamon
1/4 teaspoon ground allspice
1/8 teaspoon ground nutmeg
2 tablespoons cider vinegar

2009_1029WafflesAndAppleButtr0010

Cook apples in apple juice or cider in a large saucepan (covered), until apples are soft (25 to 30 minutes). I use my Dutch oven for this - since it's big enough to hold all the apples and they won't jump out of the pot when I'm stirring. Put apple mixture in food processor bowl fitted with metal blade (or 5-cup blender - that's what I use). Cover; process until smooth (1 to 2 minutes).

2009_1029WafflesAndAppleButtr0011

Return apple mixture to same pan; stir in all remaining ingredients.

2009_1029WafflesAndAppleButtr0013 2009_1029WafflesAndAppleButtr0014

Cook over low heat, stirring often, until mixture is very thick (30 to 45 minutes). I cooked mine longer, as it didn't seem thick enough. I think it was more like an hour or an hour and fifteen minutes. Serve warm or cold on pancakes, waffles, toast or warm breads. Store refrigerated.

2009_1029WafflesAndAppleButtr0016
You can freeze this for as long as you want, or you could also put it into jars and can it as well. If you do that, I'd process the jars under an inch of boiling water for 10 to 15 minutes.

What, you haven't done any canning before? It's easier than you'd think. We'll have to talk about that later. Questions about canning before then? Ask away, I'll answer what I can.

Wednesday, October 28, 2009

Norwegian Baking


07-dec-26
Originally uploaded by sashafatcat
It seems as though I always start digging out my Scandinavian recipes as soon as the temperature drops near the 40 degree mark. That would be about 4 1/2 degrees Celsius, if you're in Norway or any part of the world other than the U.S., Burma or Liberia.

I guess when I realized that most of the world is using the metric system, it dawned on me that it wouldn't be such a bad idea to post the metric equivalents for ingredient measures when I post recipes! Well, I may or may not - all depending on how motivated I am.

Lately that hasn't been much, as I'm sure you've noticed by the frequency of my posts. Sorry, I hope you haven't been waiting for any ideas for dinner! If you read any of my other blogs (just check my profile for links if you are interested), you'll know just how crazy my life has been lately. Or shall I say how crazy I am? Crazy enough to go back to school besides working a full-time job and raising three teenage boys.

Oh, yeah - I also hit a deer last Wednesday with my van. More venison recipes will follow! But venison aside, I digress - where was I? Oh yeah, the Scandinavian recipes! I found a steal of a deal on eBay, and couldn't pass it up. I bought an old Krumkake iron for under $10. They're usually more like $40. Of course this isn't the fancy electric kind that makes two at a time, but it will keep me busy while the boys are frying rosettes. The picture here was another one I found on Flickr - so good of the kind people there to share their photos and allow others to use them! It sure helps me out when I'm too busy to get photos taken of my own. Check back for step-by-step photos of my Norwegian recipes - My next few posts will be dedicated to those, just in time for holiday baking.

Tuesday, September 15, 2009

Pretty Enough to Eat?

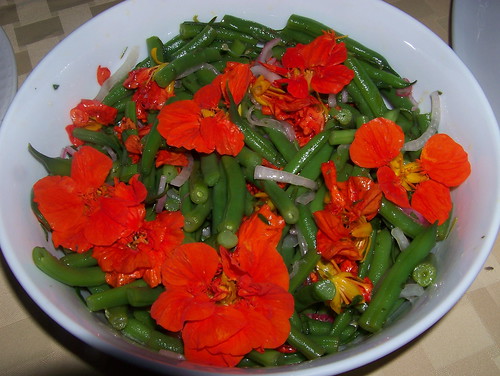
Photo of Green Bean and Nasturtium Salad With Tarragon Dressing

I found the above photo on foodistablog's photostream on flickr. Pretty, isn't it? I learned something interesting recently, and wanted to share it with you. A lot of people realize that some flowers are edible. Nasturtiums, like the ones shown above in that beautiful salad, dandelions, chamomile and lavender flowers are commonly used as food. There's a great article on What's Cooking America, which goes into detail which flowers are edible and how you can prepare and use them.

The interesting fact that I learned, which I mentioned above, is that morning glories are definitely NOT on the edible list!

Not that I had planned on eating my morning glories, I think they are too pretty to cut. This beautiful bloom is from my own garden, caught after a morning rain.

Eating morning glories can cause LSD-like hallucinations, which in itself doesn't sound all that horrible if that's your cup of tea, but the "...which leads to rapid heart rate, failure, and death" part didn't appeal to me!

The part that bugs me the most is that I can't find the site that listed all of those poisonous plants and the symptoms that accompany contact with them. Let's just say that I was attempting to look up what it was that I tried pulling out of my garden without gloves. The little spines that stuck my hand left my right hand feeling like it had been injected with novacaine for about 24 hours. A little alarming, but it didn't warrant a half-hour drive to the ER at 9pm that night. I took some Benedryl before bed, though!

Word to the wise: know which plants in your area are poisonous, and always wear gardening gloves!

Wednesday, September 9, 2009

Mmm... Pot Roast with Potatoes

A good, tender, pot roast is really not so difficult. In fact, I like to make this when it gets cool outside, especially since it's not labor intensive at all.

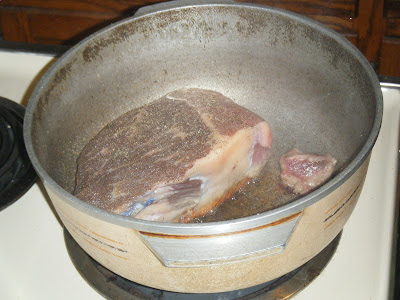
First, heat (on high heat) about 1/4 to 1/3 cup oil in a big pot with a lid. I use Extra Virgin Olive Oil, since it's better for you and it will make your roast delicious. When the oil is very hot, carefully place the chuck roast into the pan, take care not to splatter the hot oil on yourself. I use either two large forks, or a large fork and a knife. You don't want to just flip this into the pan, you may get burned.

Season well with salt, garlic salt or powder, and black pepper. Sear the roast on high heat for a few minutes on each side, until dark brown. It may look close to burned, but it's not.

After the beef has been seared on both sides, add 1 cup of water. Cover and transfer from the stove top to a 350 degree oven for one to one and a half hours (depending on the size of the roast - I did an hour and a half for a 3-lb. chuck roast). After the first hour, add quartered potatoes, some carrots, and onion if you like. Stir those into the meat juices and return to the oven for 30-40 minutes I was really rushed with other things tonight, so I only added the potatoes and did the mixed veggies in the microwave.

When the timer goes off, check a potato to see if it's tender. If it is, you are done!
If you like gravy, transfer all of the meat and veggies from the pot to a large bowl or roaster pan and cover, leaving the meat juices in the original pan. Add about 1 1/2 cups water to the pan, blending the meat juices with the water. If the mixture does not taste strong enough, add a cube or two of beef boullion. The broth should be strong. In a separate bowl (or even better yet - a cup with a tight-fitting lid, combine 3 tablespoons flour and 1 cup of water, mixing or shaking until all the lumps are gone. Stir thoroughly into the broth. Heat to boiling, stiring constantly as to avoid lumps. Boil for at least one full minute. Gravy will thicken a little more as it cools. If you like mushrooms, add a can of cream of mushroom soup to the gravy - that will stretch it a little further. I never seem to make enough gravy for potatoes, my guys all like it a lot - so the cream soup is a handy trick I picked up from my mother-in-law.

Tuesday, September 1, 2009

S'More Bars


I will admit, when the mixture for these bars was all blended together, I thought, "wow. This looks awful." The hot marshmallow goo melted the Hershey's chocolate and the whole mixture looked like a sticky brown mess. But when I tasted one, I no longer cared what it looked like. It was heaven! Not only that, it helped me use up the enormous quantity of marshmallows I purchased for my middle son's birthday party. Hardly anyone made s'mores, so what would our family do with all the leftovers? My husband hates anything marshmallow-related, even Rocky Road. Blasphemy! How can anyone hate Rocky Road???


S'More Bars

5-6 cups Kellogg's Crispix Cereal (1/2 a box)
1 pack graham crackers, crunched into 1" to 1/2" pieces
6 1.5-oz bars of Hershey's chocolate (an entire 6-bar multi pack), broken
into 1/2" to 1" pieces (reserve 1 broken up candy bar for the top of the bars)
2 bags of marshmallows, at least one of those bags should be mini's
1 stick of butter

Mix the cereal, graham cracker pieces, half a bag of mini-marshmallows
(reserve 1 cup of the minis for the top) and 5 of the broken candy bars (except
for one for the top) in a really big bowl.


Grease a large 9x13 pan with some of the butter.


Melt the rest of the butter on low to medium heat, just until melted. Add a
full bag of marshmallows and what's left of the other after putting half of it
into the cereal mix & holding out a cup for the topping. Mix the
marshmallows and butter together while they melt, blending until smooth.

First, coat your hands with a bit of butter or shortening - this will get
sticky. This next part should be done quickly, the marshmallow goo cools
quickly:

Once the marshmallow is melted and gooey, pour over the cereal mix, mixing
together until everything is covered in marshmallow.

Dump the mix into the pan, pressing it down evenly. While still warm, top
with the remaining pieces of chocolate and marshmallow and then allow for at
least 30-40 minutes before serving. I would recommend refridgerating this one if
your kitchen is warm, so the chocolate doesn't get too melted on top.