Wednesday, June 24, 2009

Charlie Brown Pie

My youngest son turned 13 on June 16th. Man, do I feel old. It doesn't seem like it was that long ago when I turned 13; now my youngest kid is 13? When did that happen???

Well, anyway, we often times do not celebrate with the traditional birthday cake, since no one in our house is a huge fan of frosting. At least not the commercially-made stuff, for the most part. And of course, everyone knows that frosting can make or break a cake. So my not-so-little one chose a family favorite for his birthday: Charlie Brown Pie.

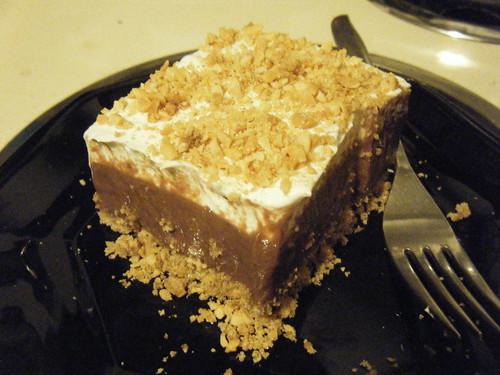
This concoction was a favorite of all the students at the elementary school which we both attended. It consisted of a graham cracker crust, chocolate pudding, followed by a layer of Cool Whip and then topped with chopped, salted, roasted peanuts; named for the Peanuts cartoon character whom we all loved and could identify with. I've seen similar recipes on the web, but this one doesn't have peanut butter in the graham cracker crust.

Charlie Brown Pie

2 packs of graham crackers (not 2 boxes, 2 of the packs that come in a box)
1/2 cup (1 stick) butter, melted
1/4 cup sugar
2, 4-oz. boxes instant chocolate pudding
16-oz tub of Cool Whip, whipped cream or other whipped topping
1/2 cup roasted, salted peanuts, chopped


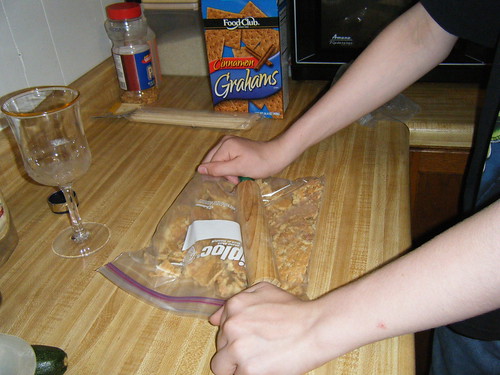
Put the graham crackers into a gallon-sized Ziplock bag and crush with a rolling pin.

Mix sugar into crumbs. Add butter and mix well, then press into the bottom of a 9x13 pan.


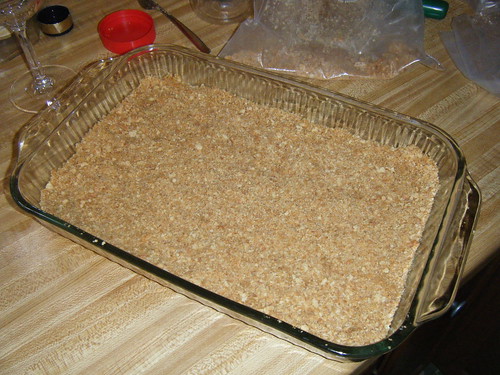
Bake at 350 degrees for 10-12 minutes, then allow to cool completely.

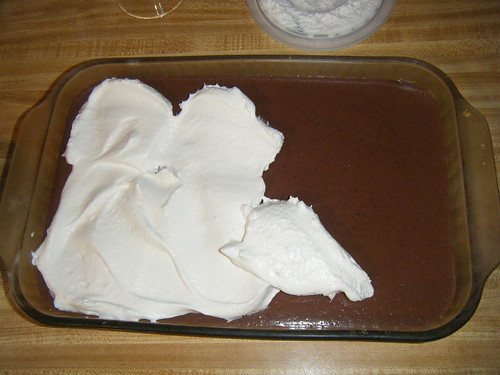
Prepare pudding as directed on package for pie filling (the directions will call for less milk than if you are preparing the mix for pudding alone); then pour over graham cracker crust. Refrigerate for at least one hour.
Top with whipped cream or whipped topping.

I do not put the chopped peanuts on top until we are ready to serve. This recipe is a great one to make ahead of time (like the day before) to share. If you refrigerate this overnight with the peanuts on top, they will get mushy - not good!

This recipe can easily be divided in half for a 9x9 square pan, if you are not serving a huge crowd - and it's great for summer, since your oven will only be on for a short while.

If you choose to add peanut butter to the crust, mix in about 1/2 cup or so, then refrigerate before adding the pudding - then you will not have to turn on the oven at all :)

Saturday, June 13, 2009

The Best Lunch Ever!

Girlfriend time is important. It doesn't matter how old you are or how busy you get, you must make time for your girlfriends. My friend Diane & I had a girlfriend day today; she had a lot of plants to put into pots and the kids were at their dad's for the weekend. I simply had to go out to her place for a visit, so we made a day of it. We started out with a trip to the nursery in a neighboring town to pick up pots & had a great lunch of salad with yummy little croissant sandwiches before we got to work. The sandwiches were Diane's idea. Call it Divine Inspiration, but she said, "Oh! I know what we can do with these!" And before I knew it, she'd sliced one in half, added a dollop of fat-free vanilla yogurt and tossed in some berries. Voila! The perfect addition to a healthy salad - good for you and tasty, too.
The salad was just a mix of things from the produce section: Dole Greener Selection salad blend, organic yellow baby carrots, Cherubs cherry tomatoes, shredded colby cheese and sunflower seeds topped with a Kraft Fat-Free Raspberry Vinaigrette dressing. Then on the side we had a little more of the yogurt topped with the fresh berries. It was really filling for a salad! And of course, being a "girlfriends day", we had to have a glass or two - what the heck, a whole bottle - of Barefoot Pinot Grigio. If you haven't tried that one, I highly recommend it - it's a light, fruity wine that's good with a salad or just for drinking when you're out with the girls.

And guys, I'm not leaving you out, either - guy time is important, too - especially because it gives us girls a break :)

Wednesday, June 10, 2009

Marinated Chicken Shish Kabobs

So I realize that marinating is not necessarily a quick thing; if you marinate meat overnight the results are wonderful, juicy & tender cuts that may have otherwise been tough as shoe leather. However, if you are marinating a meat that is tender to begin with, you might not want to let it sit in the fridge for two full days - or more like three. Well, I did just that. I planned on making Shish Kabobs on Sunday evening, so I put together a very simple marinade for some boneless, skinless chicken breasts.

Marinade
1/2 cup Extra Virgin Olive Oil
1/2 cup white wine (red is good if you will be marinating red meat like beef, venison or buffalo)
1/4 cup grilling spice (or a mix of whatever you like from the spice rack: garlic, salt, pepper, oregano & basil - if you like a Mediterranian flavor. Spice blends make this easy, because you don't have to think about what proportions will do well together. Chili powder, cayenne pepper or crushed red pepper are great spicy additions, but remember that those spices will really heat up your recipe when used in a marinade for longer than a few hours.)
1 cup water

Mix everything together in a Tupperware bowl or another sealable container. A gallon-size freezer ziplock bag will work; if you use one of those, put the bag on a plate in the fridge to marinate - just in case the bag doesn't get sealed properly - not saying the bag would leak otherwise:)

I used an entire 3-lb bag of individually quick-frozen skinless, boneless chicken breasts for this recipe. We're really picky at our house about getting all the fat off of the meat prior to cooking, if you are too I would recommend that you remove the "nasty goopy parts" before marinating, and cutting the meat into 2" pieces while still partially frozen. Your hands will get cold, but it will be easier to handle.

For the vegetable, I used two bell peppers (three would've been better), cut into 2" squares, and one 8-oz. package of button mushrooms. If hubby weren't allergic to onions, I would have added wedges of red onion to the mix. If you choose to marinate the veggies as well, toss them in a bag with about 1/2 italian dressing about 15 minutes before assembling the shish kabobs.

Add whatever meat you plan on marinating, and mix so that all pieces are covered. Let that all soak together in the fridge for 2 hours to overnight. I used chicken for these kabobs, and although the meat was practically falling apart when I assembled the skewers, letting it marinate for an extended time frame wasn't so bad. I simply added some mushrooms and green bell peppers (which helped to hold the chicken on the skewers so it didn't fall off and between the grill grates)The results were delicious...

Even if they didn't hit the grill until Wednesday evening!


**Helpful grilling hint: Soak the bamboo skewers in water for about 10 minutes, then stand them up in a cup in the freezer for at least 2 hours before grilling - this will prevent them from burning on the grill. If you do this when you prepare the marinade, they will be ready when you are.

Monday, June 8, 2009

Drunken Pork Ribs

If you can spare a can of beer (or steal one from your hubby's stash, like I do occasionally), this is a great recipe for a hot summer day when you'd rather be outside than in. There's virtually no prepping, and if you use paper plates there will be just as little to clean up, as well.

Drunken Pork Ribs

Boneless pork ribs

1 can of beer (one can for 6-8 ribs, use 2 cans if you need more)

Steak or grilling seasoning of your choice (Lawry's Seasoned Salt or Famous Dave's Steak & Burger Seasoning work really well)


Generously season the ribs in a large bowl with a cover or a big pot with a lid.


Pour the beer over the ribs.

Stir the mixture so that all the ribs have been coated. Marinate for 2 hours to overnight.


Light up the grill; if you are using the old-fashioned charcoal grill like I have, be sure the coals are white-hot and spread evenly across the bottom of the grill to avoid hot spots.
Put the ribs on the grill, no additional seasoning is necessary. Discard the marinade - never reuse that stuff!


Grill for about 7-8 minutes, then flip and grill another 7 to 8. I cut halfway through the thickest piece to check for doneness - any juices should run clear.
Serve with BBQ sauce, if desired, & enjoy!

Thursday, June 4, 2009

Easiest Baked Rhubarb Dessert Ever


This one is weird. I mean it. If you've never made a dump cake you will find yourself wondering if you really are not supposed to prepare the cake mix first or add the water to the Jello. But go ahead, just follow this one exactly as it's written. I felt guilty making it, because the only thought running through my mind is that the kids were going to be climbing the walls with all the sugar in this dessert. But Rhubarb Season doesn't last very long, anyway, and I am only going to make this once; or at least I consoled myself with this thought as I dumped all of the ingredients into the pan and popped it into the oven. Then I tasted it. I will definitely make it again, I will have to share it at work though. I told a friend at work about this, and she said the only reason I had to feel guilty was that I didn't share!

This one comes from a friend at our church, via the Our Savior's Lutheran Church Cookbook. She's one of those Lutheran church ladies, you know the kind - reminds everyone of their favorite grandmother and can cook and bake like no one's business. It's simply called

Quick Rhubarb Dessert

3 to 4 cups rhubarb, cut into 1/2" pieces

1 box white or yellow cake mix

1/3 cup butter, melted

1 box strawberry jello (dry powder) - 3 oz. size

1 cup sugar

1 cup hot water

Grease and flour bottom and sides of a 9x13 baking dish. In the order given, layer the ingredients into the pan. Bake uncovered at 350 degrees for 45 minutes. Allow to cool before serving.


We had ours when it was still a little warm, with a scoop of ice cream on the side. Yet another dessert I could easily finish off entirely on my own! I brought a piece to eat with my lunch, but it didn't make it to noon. I will say it was even better when it had totally cooled off, and it was easier to take out of the pan. Somehow, I totally missed the "grease and flour the pan" part of the recipe; the only part that was hard to take out was the top, because all the sugar in the topping adhered to the sides, which is why I would recommend greasing and flouring the sides as well as the bottom of the baking dish.

This blog should have probably been called "Sandi's Expanding Derriere Recipe Box", as I've noticed a lack of healthy stuff here. I really don't cook and bake like this every day, but I will admit that if I could eat like this all of the time, I would. If you've ever seen the movie called "Defending Your Life" (with Albert Brooks and Meryl Streep), heaven is depicted as a place where you can eat whatever and as much as you want and not gain a pound. It does sound a little gluttonous, but the concept is a pleasant dream! So I will add a few more healthy recipes, too - because I know we don't all want to be blogging about our weight problems, and I certainly don't want to be the blame! But maybe next time. For now, try out this recipe - just make sure you bring it to work or the next family gathering so you aren't tempted to eat the whole thing :)

Monday, June 1, 2009

Potato Soup - Souper Cheap Meal!

My family has never been wealthy. Most of the meals I remember best from my childhood were simple to make, required very few ingredients, and are still very accomodating for any budget. My grandparents survived the Great Depression - as working adults who had to watch every penny. During my early teen years I spent a lot of time with them, and it made a huge impression on how I spend my money (which means I usually don't if I can go without) and how I cook. The following recipe is one that's been in our family for longer than I know. My grandmother was Swedish and Scots-Irish, so take your pick - it's probably originates from one of those!


Potato Soup
4-5 medium potatoes (one per person usually works well if you want to make a smaller or bigger batch)
water
1 medium onion (white or yellow), diced, or 1/3 cup dehydrated onion flakes
salt
pepper
1/2 cup or 1 stick butter or margarine
1 cup flour
baking soda
1 egg
milk - about 3 to 4 cups

Peel & dice potatoes, about 1/2 - to 1 inch cubes. Put in large pot, add water to cover by 1/2-inch. Add onion, about 1 tsp salt and about 1/2 tsp black pepper. Turn heat on high, until the water is at a full boil.


While the water is heating up, prepare dumplings as follows:


In a small bowl, combine 1 cup flour, a little salt (see photo - I hardly ever use measuring spoons. this is about 1/4 to 1/3 of a teaspoon or so), and a pinch of baking soda.


See this next photo - this is how my mother taught me to measure the baking soda: just a little on the end of a fork handle will do. I just happen to have flatware that is similar to what Mom had! I'm guessing 1/8 teaspoon would work fine.


Add 1 egg to the flour, salt and baking soda, then mix together until the dumpling mix is the consistency of big crumbs; it should look like this:


By the time you are done preparing the dumpling mix, the potatoes and onions should be boiling.

Once this is at a full boil, add 1 stick of butter and enough milk so that the soup looks more like milk than water. I never measure this, as I was taught to do this by sight - which is why the pictures are necessary! If I had to guess, probably about 3 cups of milk go into the pot.

If you add less milk than is needed, your soup will be very thick and can be thinned with more milk later. If you add too much milk and the soup is too thin, a little more flour or a little mashed potato flakes will thicken the soup - and no one will notice (trust me - I know!)


Bring the soup back to a boil, then stir in dumpling mix. Clumps are good - those will cook into dumplings; I don't recommend leaving clumps larger than an inch or so in diameter, as the larger ones will not cook through as quickly as the others. After the dumplings have been thoroughly stirred into the soup, cover and simmer for about 20 minutes, or until the dumplings are tender and cooked all the way through.

If you choose to add other items to the soup, the last 20 minutes is the time to do so. Additions aren't traditional, but some people like a little more than potatoes and dumplings in their potato soup.


Some good additions are ham, chopped roast beef, sauteed garlic, mushrooms, and/or whatever vegetable you like. This is a good way to use up whatever leftovers you have in the fridge that might not be enough to serve an entire family. Cheddar cheese sprinkled on top makes this soup really good, too. We've always served it without the extras, adding a pat of butter to the top. If you like the soup a bit thinner or need to cool it, just stir in a little milk.


Of course, when serving homemade soup, don't forget the crescent rolls!